Dashboard Settings
Dashboard Settings lets you select the Call DNA outcomes to be included in Lost Opportunities calculations. By default, the following Call DNA outcomes are included:
| Outcome | Definition |
|---|---|
| Hold-Time Abandon | The caller was put on hold either by an IVR |
| IVR/Voicemail Abandon | The caller reached a voice mail recording or IVR, but disconnected without leaving a message or speaking to an agent. |
| Ring Transfer Abandon | The call was answered and then the caller was transferred by an IVR or an agent. The caller disconnected before speaking to an agent. |
| Unanswered |
The call was forwarded successfully to the Forward To
|
Choose Call DNA Outcomes
To choose the Call DNA outcomes for the dashboard, follow these steps:
-
Select Dashboard Settings
 . The Dashboard Settings displays.
 -
Select the Call DNA outcomes that you want.
- Select Save Settings. The Lost Opportunities dialog box closes and the dashboard updates automatically.
Create Custom Lost Opportunity Outcomes
To create a custom Lost Opportunities outcome, follow these steps:
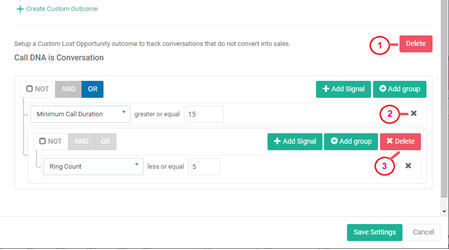
- Select + Create custom outcome. The Settings window expands to display additional parameters.
- Select + Add signal to set parameters.
- Minimum call duration (seconds)
- Ring count (rings less or equal)
- If you are applying multiple elements, select the rule logic: NOT, AND, OR.

| ID | Usage |
|---|---|
| 1 | Clear the custom rules |
| 2 | Delete the rule element |
| 3 | Delete the associated signal or group rule |
Build the rules
To build the rules, follow these steps:
- Select Add signal to begin setting up the rules.
- Select Select a Rule.
- Choose an option from the list. Rules consist of three columns. The first column is the rule type. The content of the second and third columns varies depending on the type of rule that you selected:
- "Appointment" is configured as a keyword on your account.
- A recorded greeting includes the word "appointment"
- Select Save settings when complete.
| Term | Usage |
|---|---|
| Call DNA Outcome | Typically, choose Conversation. This means that there was a dialog between the caller and the agent. |
| Call Status | Typically, choose Answered. This means that the call was answered at the Forward To phone number. |
| Minimum Call Duration | This allows you to specify a Minimum Call Duration (in seconds). |
|
Agent Spotted Keywords Caller Spotted Keywords |
With either of these signals, the second column allows you to specify when in the call the keyword was spotted. The default value is at any time. However, this may be misleading in some scenarios. For example: |
| Sentiment | Sentiment is available across every call where a transcript is available. The sentiment score is provided by channel, Agent and Caller. Sentiment provides insight into the negative or positive emotion based on the transcription text. The signal provides the ability to target specific calls that contain an overall positive or negative sentiment. |
| Redaction | When Redaction is enabled on your account, call recordings are processed to remove consecutive digits in a long number. The digits are replaced with beeps before the recording appears in the Call Log. If your company takes transactions over the phone, calls that have had part of the recording redacted are a strong indicator that credit card information was provided. This may indicate a conversion. |
| Modeled Conversion | Marchex can build out custom models to predict conversions. Contact Client Services if you are interested in having a custom model built for your account. |